Installing aluminum fencing can be a complicated process. Every fence style is different and separate manufacturers can require special instructions for their gates and fences. With these step-by-step instructions, installing Delgard aluminum fences is a bit easier. While these instructions are based on Delgard’s Avalon style fencing with a 3’ gate, the process is similar for installation of other Delgard styles.
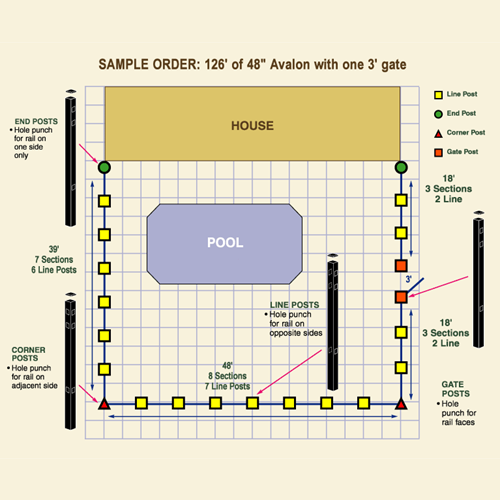
The first step for any fencing project is to planning. Before you even decide on a style, it helps to lay out the fence line. This will ensure you know exactly how much material you need to order. Below is a sample line drawing of a fence line.
How To Plan Out Fences
- Sketch out the area where you wish to install your Delgard aluminum fence. Your drawing doesn’t have to be this detailed, though it will help you choose a style.
- Choose a style. Most residential sections of Delgard’s aluminum fencing come in pre-assembled 6′ sections, but some industrial grade fences have different panel lengths. This is why it’s so important to get a detailed drawing of the property you wish to fence.
- Now that you have an idea which style you’d like to use, it’s time to update your drawing. Establish all gates and transition locations which may need to be accounted for now that you have an idea just how much space you need to enclose.
Installation Tip: Before you order materials, consult with your local utility companies to ensure you won’t be digging post holes near any utility lines which might be running under your property as this may affect your fence line. Also be sure to speak with someone about local zoning laws you may need to be aware of before installing fences. - Determine the number of sections. Remember, if a section is less than the full length of the original section, this will require the section to be trimmed. For example: using an Avalon style fence with 6′ sections for a 28′ area, you would order five sections. 5 x 6′ sections = 30′, or 2′ of extra fencing. During installation, this will mean trimming 2′ from the fencing sections. You can either trim a single panel the remaining 2′ or a multiple sections to make the fence symmetrical.
- Determine the number of fence posts you’ll need based on your line drawing and measurements. Posts should be placed on your line drawing based on how long your fence sections are.
Installation Tip: When accounting for posts, all gates must be installed with right and left gate posts only. Corner posts will go anywhere the aluminum fence turns. End posts will only go at beginning and end of the enclosed area. - Enhance your design as you like by adding accessories like butterfly scrolls, triad finials, and ball caps. While this has no effect when installing aluminum fences, it can add a nice aesthetic touch to any property.
- Order your fencing supplies. Now that you’ve got an idea exactly how many sections, parts, and accessories you need to fence your space, it’s finally time to order your materials.
Basic Delgard Aluminum Fence Installation Instructions*
For this installation guide, keep in mind we’re using the Avalon-style fence as an example. Be sure to work on a day when you’ll have nice weather. If this is a do-it-yourself fencing project and you don’t have much previous experience, we recommend you have at least one other person to help you. Some projects can be completed in a day, but be aware it will be a lot of work to install your aluminum fence.
- Measure and mark the fence line. When beginning your project, it helps to mark where each of the fence posts are going to be installed.
- Dig your fence post holes. We recommend using a post hole digger in a pinch, but an auger is much easier, faster, and more precise. Unfortunately, augers also tend to be more expensive, but it’s definitely worth it if you can get access to one.
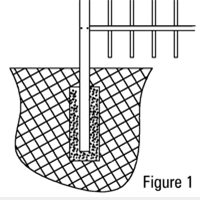
- Next, insert the correct post into the newly dug hole. (See Figure 1 Below) Remember: there will be physical differences between line posts, end posts, corner posts, and gate posts.

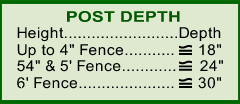
Installation Tip: The depth of your post hole will vary depending on what height your fence sections are. Delgard recommends the following:

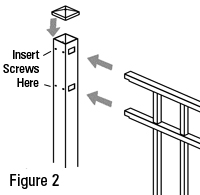
- Slot the fence-section rails into the post. (See Figure 2 Below) The fence posts should have pre-punched holes where the fencing sections will slide into the posts. Since Delgard fence sections are pre-assembled, you won’t need to worry about assembling the pickets and rails prior to installing a Delgard aluminum fence.

Installation Tip: Although this stage can be done one section at a time, we recommend setting up all fence posts prior to sliding in gate sections and filling the posts with concrete. - Fill the post holes with concrete. This will stabilize your aluminum fence and seal the sections into the fence posts.
Installation Tip: the weather and temperature can impact this stage. For example, in hotter weather, you may want to add just a bit more water to the cement so it doesn’t set before you have a chance to properly position your fence posts and sections. Be sure to account for any environmental factors when installing fences. - Secure fencing sections to posts using the included screws. Although the concrete will make your fence more stable, it will not keep the sections in place. Use the screws included with your materials to attach the fence sections to the aluminum posts.
- While the concrete is setting, plumb and level the posts and pickets. You may need to brace the post while the concrete sets to keep the fence straight and stable.
Installation Tip: Be sure to only fill one or two posts at a time. It will take time to attach sections to your fence posts and the concrete could dry before you reach sections later on. - Now it’s time to hang your gate or gates on the proper posts. Don’t forget: there may be a difference between the right and left gate posts. Be sure to install your gate facing the correct way.
- Finally, install any additional post hardware or accessories you ordered to accent your fence. This might include finials for your pickets, post caps, or scrolls.
*Keep in mind, pickets, posts, rails, gate posts, spacing, centers, heights, colors, alloys, and strengths will vary from style to style. Although this might lead to some small changes, all Delgard aluminum fences come with detailed installation manuals specific to your style of fencing.

