[No PDF Available at this time]
FREEDOM aluminum fencing is manufactured by Barrette and available exclusively through Lowe’s. If you’re considering installing this brand of aluminum fence in your home, you can follow these basic guidelines to get your property fenced in.
As with any other fencing project, you need to draw a fence line. Either get an accurate diagram of your property or measure the area where you plan to install your fence. If your property is sloped, we recommend actually measuring the line as the slope may differ in measurement from the property lines on a diagram. You should also check local zoning laws to ensure you can add to your property. As a final step before ordering materials, contact local utilities companies to check for underground lines which may affect your fence line.
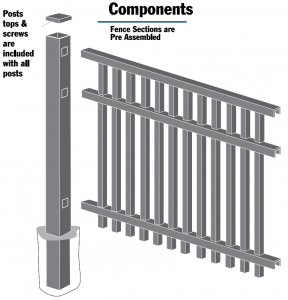
Now it’s time to order materials. FREEDOM aluminum fencing typically comes in pre-assembled 6 or 8 foot sections. You will need to order a number of sections based on the total length of each side of the fence rounded up. For example, if you choose 8′ aluminum fence sections and one side of the fence is 26′, you will need to order four sections of fencing and trim roughly 6′ from either one section or around 8″ from each section to fit the fenced area. You will also need to order two end posts, a gate or gates, gate posts, corner posts, and line posts. There will be one aluminum end post for each end of the fence, one or two gate posts per gate, a corner post every time the fence turns, and line posts for every section of fence except where the fence’s sections attach to gate, corner, and end posts.
As an example, if you have 26′ of fence on each side with a house on the fourth side, you need three sides of fence. If there is a single gate on the right side of your fence, this side will require one gate, two gate posts, one end post, one corner post, and three sections of aluminum fence. Note – there are only three fence sections on this side because the gate will count as one section. The fence will turn and require an additional four sections of fence, three line posts, and one more corner post. For the left side of this FREEDOM aluminum fence, there will be four more 8′ sections of fencing, three line posts, and an end post.
For this fence, that would mean:
1 Gate
2 End Posts
2 Gate Posts
2 Corner Posts
7 Line Posts and
11 Fence Sections
You may also want to consider additions like post caps, scrolls, accents, customized finials, and lighting. Companies like Tru-Post even make aluminum fence post caps with solar lights and planters for flowers. After ordering fencing supplies, keep in mind: Depending on the size of your order, Lowe’s may have to ship your order to their store. You may also be responsible for transporting the fencing sections, gates, and posts from the store to your home or business.
Once your fencing supplies have been ordered and delivered, it’s time to get started. If this is a do-it-yourself project and you’ve never installed a fence before, you may want to consider a few things. First, make sure you work outside on a nice day. If the weather is too hot, you may get dehydrated easily and the concrete could dry before you have the chance to properly position your aluminum posts and slot the fence sections in. Second, depending on the fence’s length, this could be a lot of work. See if you can get some friends and family to help you work through the project quickly. Finally, you might want to rent or buy an auger. Using a post hole digger can be exhausting and time consuming. Augers from companies like Little Beaver will speed up the process and give you more precise post holes.
If you’ve got all your tools and think you’re ready, let’s get started.
1. Draw out your fence line and mark where each post is going to go.
2. Dig each one of your post holes. It’s much easier to dig all the post holes instead of going down the fence line one at a time. This is where augers will save you a lot of time.
3. Line up your first aluminum post in the appropriate post hole. Remember: corner posts are punched on adjacent sides, end posts have holes only on one side, and line posts have holes punched on opposite sides. Lowe’s also sells FREEDOM aluminum fence posts without pre-punched holes so you can easily customize your fence. This especially comes in handy if you are installing fences on a sloped property.
4. Use a rubber mallet to drive the post cap onto the top of the aluminum post. Be careful not to damage the post top. It is easiest to start with an end post or gate post, since these posts tend to be reinforced with a bit more aluminum alloy to strengthen key areas of the fence.
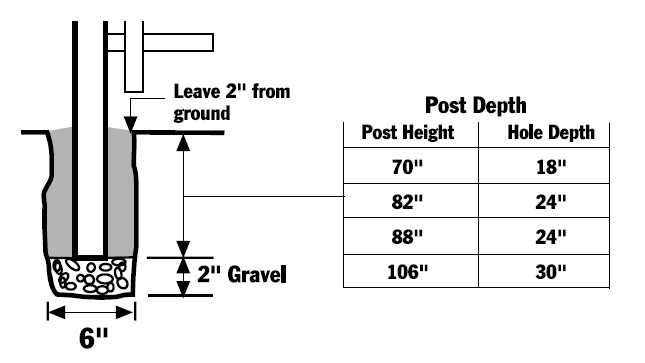
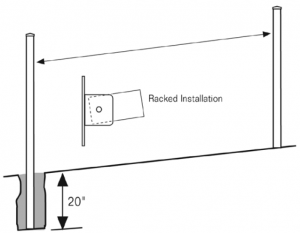
5. Insert the fence section into the holes in post. Fence sections must be inserted all the way inside post holes to meet BOCA code. As an example, see the diagram below.
6. Cut your fence sections. If you haven’t cut the sections yet, you may need a fine-tooth-blade hack saw or a circular saw. Before you cut the sections, decide whether you want each section to be the same length (proportional spacing) or cut a single section per side of the fence (remainder spacing). Be sure to cut the fence sections before pouring your concrete. This should give you the most time to properly position your aluminum fencing sections.
7. Fill the post hole with concrete mix being sure the concrete extends below the bottom of post. You will need to adjust the post into the proper position so the fence post remains upright. This is the main reason it’s better to install your fence on a nice day.
7. Plumb the fence posts and pickets while the concrete is setting. The aluminum fence sections can rack allowing the rails to follow the contour of the ground. Brace the posts as necessary while the concrete is setting. This will help keep it upright and steady while the concrete sets.
8. Fence rails will need to be mitered for corner posts.
9. After concrete has set, fasten the fence section to the posts using #8 x 1” self-tapping screws. These screws should come with your fence order. Be careful not to over-tighten since screw heads may break off or strip out.
10. Continue installing fencing sections until the perimeter is set up.
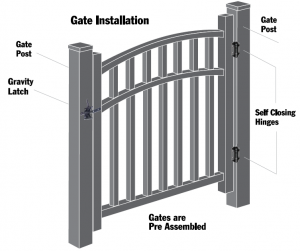
11. Finally, install the gate or gates. Slot your gate into the punched holes in your gate posts and attach any hinges.
12. Install any accents like decorative post caps, lighting, or finials.
Additional Information – Setting Posts:
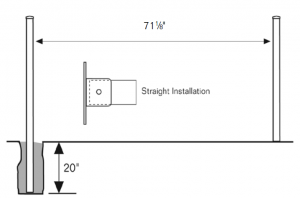
The following diagram only applies to 6′ fencing sections. For larger aluminum sections, use your best judgement, but you should be able to subtract roughly 7/8″ from the total length of the section for the spacing between posts. For straight installations of 6′ sections, fence posts should be set 71 and 1/8″ inside edge to inside edge for the fencing section to properly slot into the gap between posts.
For racked installation for fencing on a slope, the distance between the distance between posts will be determined by angle. For installing fence on a slope using the racking method, you may want to consider buying fence posts without pre-punched holes so you can appropriately angle the aluminum sections. Generally, racking should only be done on a grade of 10 degrees or more.

